
If you are looking for a simple way to turn classroom quizzes into interactive games, Gimkit Host gives teachers a way to create and manage live learning sessions while students participate from their own devices. Instead of simply answering questions one after another, students can interact with game mechanics, compete with classmates, and see their progress during the session.
But what is Gimkit Host actually like to use? How do you host a Gimkit game, where do students enter the game code, and which settings should you choose before starting?
This complete guide covers the entire Gimkit hosting process, from selecting a Kit and choosing a game mode to sharing the Gimkit host code, managing players, and reviewing the overall experience. It also looks at the difference between hosting and joining, common problems, free options, and practical tips for teachers.
What Is Gimkit Host?
Gimkit Host refers to the teacher or person who creates and runs a live Gimkit game. The host controls the main parts of the session, including the Kit, game mode, game options, lobby, and when the game starts.
Think of the host as the person running the classroom activity. Students participate as players, while the host manages the experience from the teacher’s side.
A typical Gimkit game host starts by selecting a Kit containing questions. The host then chooses an available game mode and adjusts the settings for the activity. Once the game is ready, students can enter using a Gimkit game code, QR code, or shared join link.
This makes Gimkit different from a traditional quiz because the teacher is not simply sending questions to students. The host creates the environment in which the students play.
What Does a Gimkit Host Control?
Depending on the selected mode and available account features, the host may control things such as:
- Which Kit students use
- The game mode
- Game-specific options
- Player access
- The lobby
- Game start
- Certain in-game controls
- Player progress
- Final results
The exact options can vary depending on the game mode, so it is worth checking the available settings before starting your session.
For teachers, this setup can be useful because a single host can organize an activity for an entire class without requiring every student to create and configure a game.
How to Host a Gimkit Game Step by Step
Learning how to host a Gimkit game is relatively straightforward once you understand the basic workflow. The process starts with preparing your questions and ends with students joining your live session.
1. Choose or Create a Kit
The first step in Gimkit hosting is selecting the Kit you want to use.
A Kit is essentially the collection of questions that powers your game. You can use an existing Kit or create one based on the subject you are teaching.
For example, a teacher might create Kits for:
- Mathematics revision
- Vocabulary practice
- Science concepts
- History
- Exam preparation
- General knowledge
Preparing your Kit before class is a good idea because it allows you to spend less time setting up when students are already waiting.
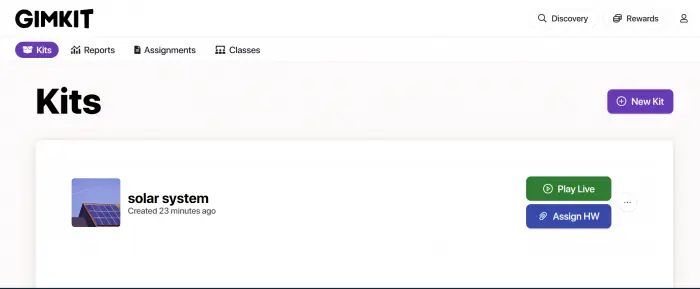
2. Click Play Live
Once your Kit is ready, the next step is to launch it as a live activity.
Look for the option to play the Kit live. This takes you into the setup process where you can select the game experience you want your students to use.
This is the point where the teacher becomes the Gimkit live game host rather than simply creating a set of questions.
3. Select a Game Mode
Gimkit offers different game modes, and your choice can significantly affect the classroom experience.
Some modes focus heavily on competition, while others may encourage teamwork, strategy, or different types of interaction.
When choosing a mode, think about your lesson objective.
If you only have ten minutes for revision, a fast-paced mode may work well. For a longer class activity, you may prefer something that gives students more time to interact with the game.
The best Gimkit game modes are not necessarily the most complicated ones. The right choice depends on your students, lesson, class size, and the amount of time available.
4. Configure Game Options
After selecting a mode, review the available game options.
These settings can change the way students experience the activity. Depending on the selected mode, you may find options related to game goals, time, late joining, player names, classes, or other gameplay elements.
Take a moment to review the settings rather than immediately starting the game.
For example, if students frequently arrive late, allowing late joining may be useful. If you want to keep the activity focused on revision instead of competition, you can choose settings that better match that goal.
5. Open the Lobby
After configuring the game, you will reach the lobby.
This is where students can connect to the session before the game starts.
The lobby is also a useful opportunity for the host to check whether students have successfully joined. Depending on the available joining method, students may use a code, QR code, or link.
If you are teaching a large class, displaying the joining information on a projector or classroom screen can make the process easier.
6. Share the Gimkit Host Code
One of the most important parts of a live game is the Gimkit host code.
The host receives a game code that students can use to enter the session. This is sometimes also referred to as the Gimkit game code or Gimkit join code.
Students generally enter the code through Gimkit’s joining interface.
You can display the code on your classroom screen, read it aloud, or provide the joining link when appropriate.
7. Start the Game
Once the students have joined, check the lobby before starting.
Make sure the expected players are present and that there are no obvious problems with names or connections.
When you are ready, start the game.
At this point, students become active players while you continue acting as the host.
8. Manage the Live Game
During the session, the host may have access to different controls depending on the game mode.
You can monitor participation, follow progress, and manage available host options.
This is one of the strongest parts of Gimkit host game functionality because the teacher remains involved rather than simply launching a quiz and waiting for results.
How Do Students Join a Gimkit Host Game?
Once a teacher creates a live session, students need a way to enter it. Gimkit provides several ways to join a live game.
Join With a Game Code
The most recognizable method is the Gimkit join code.
The teacher displays the code, and students use the appropriate Gimkit joining page to enter it.
After entering the code, students can follow the instructions shown on their screen to enter the game.
This method is particularly useful in classrooms because the teacher only needs to display one code for everyone.
Join With a QR Code
A QR code can make joining even faster, especially when students are using smartphones or tablets.
Instead of manually typing the game code, students can scan the displayed QR code and proceed to the game.
For younger students or large classes, this can reduce the amount of time spent explaining where to enter the code.
Join With a Link
A host may also provide a direct joining link.
This can be useful for remote classes, online lessons, or situations where the teacher is communicating with students through a learning management system or chat platform.
The important thing is that students enter the correct active game session rather than trying to join an old or expired game.
Best Gimkit Game Modes for Different Situations
Choosing a game mode is one of the biggest decisions a Gimkit host makes before starting a session.
There is no single best mode for every classroom.
Best for Quick Review
For a short review activity, choose a mode that gets students into the questions quickly and does not require a lot of explanation.
This is useful when you only have a few minutes at the end of a lesson.
Best for Team Activities
If your objective is collaboration, a team-oriented experience can encourage students to work together instead of focusing only on individual rankings.
Team activities can be particularly useful for classroom revision where discussion is part of the learning process.
Best for Younger Students
Younger learners may benefit from simple game mechanics that are easy to understand.
Before starting a Gimkit live game, explain the basic objective and allow students to understand what they are expected to do.
Best for Longer Sessions
For a full-class activity, you can select a mode that provides enough variety to keep students engaged.
However, longer does not always mean better. A well-planned 15-minute session can be more effective than a poorly structured 45-minute game.
Important Gimkit Host Settings
The settings available during Gimkit hosting can have a major effect on your session.
Game Goals
Some modes allow the host to configure goals that determine how the activity progresses or ends.
Always review the goal before starting so you understand what students are trying to achieve.
Late Joining
Late joining can be useful in real classrooms where students may arrive after the game has started.
If your class is likely to have students joining at different times, check whether the selected mode provides a late-join option.
Nickname Generator
Student names can sometimes create unnecessary distractions. Gimkit provides a Nickname Generator feature that can help create automatically generated names for players.
This can be useful when you want students to enter the game quickly without spending time choosing usernames.
Classes
If you use Gimkit Classes, the experience can be different because students can be associated with your class.
This can make managing recurring classroom activities easier.
Player and Spectator Options
Some game experiences may distinguish between active players and spectators. If you are using a 2D-style game, check the available player settings before beginning.
Understanding these options before your Gimkit host game starts can prevent confusion later.
Gimkit Host Review: Pros and Cons
After looking at the setup process, the overall experience is fairly easy to understand. However, Gimkit is not perfect for every classroom.
What I Like About Gimkit Host
Easy setup: Once your Kit is prepared, getting a live game running does not require a complicated process.
Interactive experience: Students are not simply completing a static list of questions. Game mechanics can make revision feel more active.
Multiple joining methods: A game code, QR code, and link give teachers flexibility.
Different game experiences: Different modes allow teachers to adapt activities to their classroom.
Real-time participation: The host can monitor the activity while students are playing.
Useful for revision: Gimkit works particularly well when the goal is to review material students have already learned.
What Could Be Better
Can become too competitive: Some students may focus more on winning than understanding the questions.
Settings require attention: Choosing the wrong game mode or configuration can make the activity less effective.
Feature availability varies: Some features may depend on the account type or specific game mode.
Technology can interfere: Internet problems, device issues, or browser problems can interrupt an otherwise successful session.
Overall, my Gimkit host review is positive for teachers who want interactive classroom revision, but the platform works best when the game supports the lesson rather than replacing the lesson.
Gimkit Host vs Gimkit Join
It is easy to confuse the host and join sides of Gimkit, especially if you are using the platform for the first time.
The Gimkit host is responsible for creating and running the game. The student uses the join process to enter an existing session.
| Feature | Gimkit Host | Gimkit Join |
| Creates the game | Yes | No |
| Selects Kit | Yes | No |
| Chooses game mode | Yes | No |
| Configures settings | Yes | No |
| Provides game code | Yes | No |
| Enters game code | No | Yes |
| Starts game | Yes | No |
| Manages session | Yes | No |
| Participates as player | Not normally | Yes |
Understanding this difference makes the process much easier.
If a teacher says, “Here is the Gimkit game code,” the students do not need to create a game. They simply use the provided joining method.
Can You Host Gimkit for Free?
For teachers who are considering Gimkit for the first time, one of the most common questions is whether Gimkit host functionality is free.
Gimkit provides free account options, while some additional functionality is associated with paid plans or Pro access. Availability can change over time, so teachers should check the current official plan information before making a decision.
The important point is that you should not assume every feature shown in a tutorial is available on every account.
If you are only interested in running occasional live review games, start by checking what your account currently provides. If you need advanced classroom tools or additional features, then compare the available paid options.
Tips for a Better Gimkit Hosting Experience
A good host does more than simply start a game.
Prepare Your Kit Before Class
Don’t create all your questions while students are waiting. Preparing the Kit in advance gives you more time to focus on the actual lesson.
Choose the Mode Based on Your Objective
Ask yourself what students should learn from the activity.
If the goal is vocabulary recall, a fast review may be enough. If the goal is collaboration, choose an experience that supports discussion and teamwork.
Test the Join Process
Before your first session, test how students will join.
Know where the Gimkit host code appears and where students need to enter it.
Display the Code Clearly
For classroom use, put the code somewhere every student can see.
If the class is large, also consider using the QR code or joining link.
Check the Lobby
Don’t start immediately after opening the game. Give students a moment to join and check the lobby.
Don’t Make Every Session About Winning
Competition can be fun, but the learning objective should remain important.
After the game, discuss questions that students struggled with instead of focusing only on who reached the top of the leaderboard.
Use Results for Revision
One of the best ways to use a Gimkit live game is as a diagnostic activity.
If many students struggle with the same question, that can tell you which topic deserves another explanation.
Common Gimkit Host Problems and Fixes
Even a simple live activity can sometimes run into technical problems.
Students Can’t Join the Gimkit Game
First, check that students have the correct active code.
If the game has ended or the code was entered incorrectly, students may not be able to enter the session.
Also check the student’s internet connection and browser.
Gimkit Host Code Isn’t Working
Make sure the student is using the current code from the active session.
A code from an older game should not be assumed to work for a new session.
QR Code Isn’t Working
If students cannot scan the QR code, make sure the code is clearly visible on the classroom display.
You can always use the manual Gimkit game code or joining link as an alternative.
Student Has the Wrong Name
Check the available nickname or player settings before starting.
If appropriate, use the Nickname Generator or your class setup to make player identification easier.
The Game Is Lagging
Start by checking the internet connection.
If several students are experiencing the same problem, the issue may be related to the classroom network rather than individual devices.
Students Joined but the Game Won’t Start
Return to the lobby and check whether all required setup steps have been completed.
Also review the selected game mode and its available settings.
Frequently Asked Questions About Gimkit Host
What is a Gimkit host?
A Gimkit host is the person who creates and manages a live Gimkit session. In a classroom, this is usually the teacher. The host selects the Kit, chooses a game mode, configures settings, opens the lobby, and starts the activity.
How do I host a Gimkit game?
Choose a Kit, select the live-play option, choose a game mode, configure the available settings, open the lobby, and share the generated game code, QR code, or link with students.
How do I get a Gimkit host code?
The game code is provided when you set up a live Gimkit session. Once the lobby is open, you can share the displayed code with students so they can join.
Where do students enter the Gimkit code?
Students use Gimkit’s joining interface to enter the code provided by the host. They can then follow the on-screen instructions to enter the live session.
Can I host a Gimkit game for free?
Gimkit provides free account options, although some features are associated with paid access. The exact features and plans can change, so check the current account options before planning a lesson around a specific feature.
Do students need a Gimkit account to join?
The joining requirements can depend on how the session and classroom are configured. A teacher should check the current joining instructions and account requirements for the particular setup being used.
Can I host Gimkit from a Chromebook?
Gimkit is browser-based, so a Chromebook can be suitable for hosting when the browser, internet connection, and account setup support the platform.
Can students join with a QR code?
Yes, a QR code can be used as one of the available joining methods for a live session. It can be particularly convenient when students are using phones or tablets.
Can I join my own Gimkit game as a player?
The host and player experiences are different. If you want to test a game, check the options available for the selected game mode rather than assuming the host account works exactly like a student account.
Can I change the game settings after hosting?
Some settings are configured before the game starts, while certain controls can be available during gameplay. The exact options depend on the selected game mode.
Final Verdict: Is Gimkit Host Worth Using?
If your goal is to make classroom revision more interactive, Gimkit Host is worth considering.
The strongest part of the platform is the combination of a relatively simple hosting process and game-based student participation. A teacher can prepare a Kit, select a suitable mode, share a Gimkit host code, and get students participating without building a complicated activity from scratch.
It is particularly useful for review sessions, vocabulary practice, exam revision, and activities where student engagement matters.
However, Gimkit should work alongside good teaching rather than replace it. The best results come when the teacher chooses the right game mode, prepares useful questions, explains the objective, and uses the results to identify areas that need further teaching.
Overall verdict: Gimkit Host is a strong option for teachers who want to turn ordinary question-and-answer revision into a more interactive live classroom experience.